Windows Phoneで提供されているAPIでは、PNGとJPEGしか扱うことが出来ません*1。しかし、Codeplexで配布されているオープンソースのライブラリの.NET Image Toolsを使用することで、GIFファイルを表示させることが出来ます。
右にダウンロードページへのリンクがありますので、ダウンロードしておいてください。執筆時点の最新ビルドのv0.3での使用方法についてご説明させて頂きます。

ビルド済みのアセンブリファイルがRARファイルで提供されているので、任意のフォルダに解凍しておきましょう。解凍するとビルド済みのWindows Phone向けのdllアセンブリが「bin\Phone」フォルダに格納されています。
GIF画像をデコード(表示)するのに必要なdllアセンブリは以下の7ファイルです。
- ImageTools.dll
- ImageTools.Utils.dll
- ImageTools.IO.Png.dll
- ImageTools.IO.Gif.dll
- ICSharpCode.SharpZLib.Phone.dll
- PhoneCodeContractsAssemblies.dll
- SharpZipLib.WindowsPhone7.dll
これらのファイルを自前のプロジェクトのフォルダに追加しておきます。ソリューション エクスプローラーにてプロジェクトを右クリックして、コンテキストメニューを表示します。メニューから[参照の追加]を選択します。参照の追加ダイアログから上記のファイルを選択し、[OK]ボタンをクリックして参照の追加をおこないます。
GIF画像を表示させる
アプリケーションリソースのGIFファイルのストリームを読み出して、BitmapImageオブジェクトのソースにデコードしたストリームを設定します
// 読み込む画像のファイル名
var uri = new Uri("image01.gif", UriKind.Relative);

var bmp = new BitmapImage();
using (var strm = Application.GetResourceStream(uri).Stream) {
    // ImageToolsを使用してGIFファイルをデコードする
    ExtendedImage image = new ExtendedImage();
    var decoder = new GifDecoder();
    decoder.Decode(image, strm);

    // デコードしたストリームをBitmapImageのソースとする
    bmp.SetSource(image.ToStream());
}

// Imageコントロールのソースに設定する
image1.Source = bmp;
シンプルなコードですが、以上でGIF画像をデコードして表示させることが出来ました。

ダウンロードしたGIF画像をListBoxへ表示する
ImageコントロールにGIF画像を表示させるだけではなく、応用的な使い方としてウェブにあるGIF画像をListBoxコントロールにて表示させてみましょう。
ここでは、ダウンロードしたGIFファイルをキャッシュとして保存して、ファイル名をバインディングしたListBoxコントロール上で表示をおこないます。
- バインディングした値(ファイル名)を別の型(BitmapImage)への変換するConverterの作成
- 画像ファイルをダウンロード(Reactive Extensions & Network)
- 分離ストレージへの保存
- .NET Image Toolsを使用してGIFファイルをデコードする
早速、利用側のMainPage.xamlから実装を進めていきたいと思います。
MainPage.xaml.cs での実装
コンストラクタで、デコーダーにGIFデコーダーを追加しています。これはアプリケーション起動後1回実行するだけで良いようです。
MainPage側では、OnNavigatedToメソッドにて、表示させたい画像のURLとテキストを設定したオブジェクトをコレクションに追加していき、コレクションをListBoxのItemsSourceへ設定します。
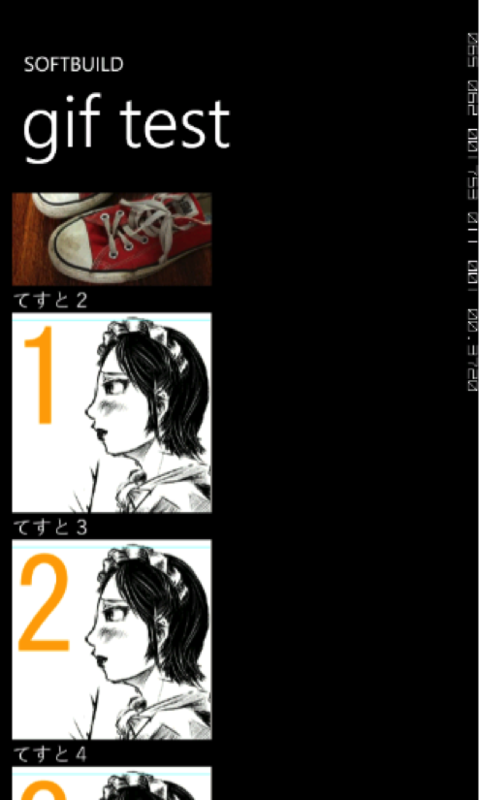
using System.Collections.ObjectModel;
using System.IO;
using System.IO.IsolatedStorage;
using System.Windows;
using System.Windows.Navigation;
using ImageTools.IO;
using ImageTools.IO.Gif;
using Microsoft.Phone.Controls;

namespace GifTest {
    public partial class MainPage : PhoneApplicationPage {
        // コンストラクター
        public MainPage() {
            InitializeComponent();

            // デコーダーを追加する
            Decoders.AddDecoder<GifDecoder>();
        }

        protected override void OnNavigatedTo(NavigationEventArgs e) {

            var list = new ObservableCollection<ImageInfo>();
            list.Add(new ImageInfo("https://p.twimg.com/AkKIvbKCQAACN04.jpg", "てすと1"));
            list.Add(new ImageInfo("https://p.twimg.com/Acg5qLwCMAEiBW-.jpg", "てすと2"));
            list.Add(new ImageInfo("http://ch3cooh.jp/files/sample_gif/image01.gif", "てすと3"));
            list.Add(new ImageInfo("http://ch3cooh.jp/files/sample_gif/image02.gif", "てすと4"));
            list.Add(new ImageInfo("http://ch3cooh.jp/files/sample_gif/image03.gif", "てすと5"));
            list.Add(new ImageInfo("http://ch3cooh.jp/files/sample_gif/image04.gif", "てすと6"));
            list.Add(new ImageInfo("http://ch3cooh.jp/files/sample_gif/image05.gif", "てすと7"));
            list.Add(new ImageInfo("http://ch3cooh.jp/files/sample_gif/image06.gif", "てすと8"));
            list.Add(new ImageInfo("http://ch3cooh.jp/files/sample_gif/image07.gif", "てすと9"));
            listBox1.ItemsSource = list;
        }
    }
}
XAML(MainPage.xaml) での実装
MainPage.xamlにはListBoxを配置しており、前述した通りコレクションをListBoxへ設定しています。
重要なItemTemplateのバインディング部分部分をピックアップしてみました。ItemsSourceプロパティにデータを保持した時点では、表示する画像はおそらく存在していませんので、ダウンロード完了後に分離ストレージに保存しておいた画像を表示するようにします。
ListBoxには、分離ストレージに格納されたキャッシュファイルのパスを渡すようにしました。コンバータを使うことで、string型CachePath(ファイルパス)の値をConverter(local:StringToImagerConverter)にてBitmapImage型オブジェクトへ変換して、Imageコントロールで表示できるようになります。
<ListBox Name="listBox1">
    <ListBox.ItemTemplate>
        <DataTemplate>
            <StackPanel Orientation="Vertical" Width="Auto" Height="Auto">
                <Image Height="200" Width="200" Stretch="UniformToFill">
                    <Image.Source>
                        <Binding Path="CachePath" Mode="TwoWay">
                            <Binding.Converter>
                                <local:StringToImagerConverter/>
                            </Binding.Converter>
                        </Binding>
                    </Image.Source>
                </Image>
                <TextBlock Text="{Binding Text}" VerticalAlignment="Top"/>
            </StackPanel>
        </DataTemplate>
    </ListBox.ItemTemplate>
</ListBox>
Binding.Converter要素にlocal名前空間のコンバータを使用していますので、名前空間を宣言しておきます。このコンバータについては後述します。
<phone:PhoneApplicationPage
    ~~省略~~
    xmlns:local="clr-namespace:GifTest"
XAMLの全文は以下の通りです。
<phone:PhoneApplicationPage
    x:Class="GifTest.MainPage"
    xmlns="http://schemas.microsoft.com/winfx/2006/xaml/presentation"
    xmlns:x="http://schemas.microsoft.com/winfx/2006/xaml"
    xmlns:phone="clr-namespace:Microsoft.Phone.Controls;assembly=Microsoft.Phone"
    xmlns:shell="clr-namespace:Microsoft.Phone.Shell;assembly=Microsoft.Phone"
    xmlns:d="http://schemas.microsoft.com/expression/blend/2008"
    xmlns:mc="http://schemas.openxmlformats.org/markup-compatibility/2006"
    xmlns:local="clr-namespace:GifTest"
    mc:Ignorable="d" d:DesignWidth="480" d:DesignHeight="768"
    FontFamily="{StaticResource PhoneFontFamilyNormal}"
    FontSize="{StaticResource PhoneFontSizeNormal}"
    Foreground="{StaticResource PhoneForegroundBrush}"
    SupportedOrientations="Portrait" Orientation="Portrait"
    shell:SystemTray.IsVisible="True" Language="ja-JP">

    <!--LayoutRoot は、すべてのページ コンテンツが配置されるルート グリッドです-->
    <Grid x:Name="LayoutRoot" Background="Transparent">
        <Grid.RowDefinitions>
            <RowDefinition Height="Auto"/>
            <RowDefinition Height="*"/>
        </Grid.RowDefinitions>

        <!--TitlePanel は、アプリケーション名とページ タイトルを格納します-->
        <StackPanel x:Name="TitlePanel" Grid.Row="0" Margin="12,17,0,28">
            <TextBlock x:Name="ApplicationTitle" Text="SOFTBUILD" Style="{StaticResource PhoneTextNormalStyle}"/>
            <TextBlock x:Name="PageTitle" Text="gif test" Margin="9,-7,0,0" Style="{StaticResource PhoneTextTitle1Style}"/>
        </StackPanel>

        <!--ContentPanel - 追加コンテンツをここに入力します-->
        <Grid x:Name="ContentPanel" Grid.Row="1" Margin="12,0,12,0">
            <ListBox Name="listBox1">
                <ListBox.ItemTemplate>
                    <DataTemplate>
                        <StackPanel Orientation="Vertical" Width="Auto" Height="Auto">
                            <Image Height="200" Width="200" Stretch="UniformToFill">
                                <Image.Source>
                                    <Binding Path="CachePath" Mode="TwoWay">
                                        <Binding.Converter>
                                            <local:StringToImagerConverter/>
                                        </Binding.Converter>
                                    </Binding>
                                </Image.Source>
                            </Image>
                            <TextBlock Text="{Binding Text}" VerticalAlignment="Top"/>
                        </StackPanel>
                    </DataTemplate>
                </ListBox.ItemTemplate>
            </ListBox>
        </Grid>
    </Grid>

</phone:PhoneApplicationPage>
バインディング用のクラスの実装
ListBoxにバインディングするクラスを定義します。
コンストラクタに設定されたURLの画像ファイルをダウンロードしてキャッシュします。既にダウンロード済みの場合は改めてダウンロードしません(ファイル名だけで同じファイルだと判断しているので、実際のアプリケーションで使用する場合には、この部分は書き換える必要があります)。
ImageInfoクラスのCachePathプロパティをバインドしておくことで、CachePathプロパティの値が変わった場合にListBoxコントロールで再描画がおこなわれます。
using System.ComponentModel;
using System.IO.IsolatedStorage;
using System.Net;
using Microsoft.Phone.Reactive;

namespace GifTest {

    public class ImageInfo : INotifyPropertyChanged {
        public ImageInfo(string url, string text) {
            ImageURL = url;
            Text = text;

            var fileName = System.IO.Path.GetFileName(url);
            using (var store = IsolatedStorageFile.GetUserStoreForApplication()) {
                // 既に画像ファイルがある場合はダウンロードしにいかない
                if (store.FileExists(fileName)) {
                    CachePath = fileName;
                    return;
                }
            }

            // urlが入ったら画像をダウンロードして、分離ストレージに保存する
            HttpWebRequest req = HttpWebRequest.CreateHttp(url);
            Observable.FromAsyncPattern<WebResponse>(req.BeginGetResponse, req.EndGetResponse)()
                .Select(res => res.GetResponseStream())
                .Select(strm => {
                    var cacheFileName = System.IO.Path.GetFileName(url);
                    using (var store = IsolatedStorageFile.GetUserStoreForApplication())
                    using (var strmWriter = store.CreateFile(cacheFileName)) {
                        var bytes = new byte[128];
                        int readed = 0;
                        while (true) {
                            readed = strm.Read(bytes, 0, bytes.Length);
                            if (readed == 0) break;
                            strmWriter.Write(bytes, 0, readed);
                        }
                    }
                    strm.Close();
                    return cacheFileName;
                })
                .ObserveOnDispatcher()
                .Subscribe(cacheFileName => CachePath = cacheFileName);
        }

        public string ImageURL { get; set; }
        public string Text { get; set; }

        private string _cachePath;
        public string CachePath {
            get { return _cachePath; }
            set {
                _cachePath = value;
                OnPropertyChanged("CachePath");
            }
        }

        public event PropertyChangedEventHandler PropertyChanged;
        private void OnPropertyChanged(string name) {
            if (PropertyChanged != null) {
                PropertyChanged(this, new PropertyChangedEventArgs(name));
            }
        }
    }
}
ファイルパスから画像に変換するコンバータの実装
ListBox内のImageコントロールにバインドされたキャッシュパスをコンバートして画像として扱えるようにします。
StringToImageConverterというクラスを作成して、IValueConverterを継承します。実装する必要のあるメソッドは下記の2メソッドです。
- public object Convert(object value, Type targetType, object parameter, CultureInfo culture)
- public object ConvertBack(object value, Type targetType, object parameter, CultureInfo culture)
コンバートするメソッドと元に戻すメソッドを定義する必要があります。
ここではstringオブジェクトからBitmapImageオブジェクトに変換するために、分離ストレージに格納されているファイルを開いてストリームを読み出し、BitmapImageオブジェクトのソースとして設定しています。
using System;
using System.Globalization;
using System.IO;
using System.IO.IsolatedStorage;
using System.Windows.Data;
using System.Windows.Media.Imaging;
using ImageTools;
using ImageTools.IO.Gif;

namespace GifTest {

    public class StringToImagerConverter : IValueConverter {

        public object Convert(object value, Type targetType, object parameter, CultureInfo culture) {
            var filePath = value as string;
            if (filePath == null) {
                return null;
            }

            var bmp = new BitmapImage();

            using (var store = IsolatedStorageFile.GetUserStoreForApplication())
            using (var strm = store.OpenFile(filePath, FileMode.Open)) {

                var ext = System.IO.Path.GetExtension(filePath);
                if (ext.ToLower() == ".gif") {
                    // 拡張子がgifの場合はImageToolsを使用する
                    ExtendedImage image = new ExtendedImage();
                    var decoder = new GifDecoder();
                    decoder.Decode(image, strm);
                    bmp.SetSource(image.ToStream());
                } else {
                    // 拡張子がgif以外の場合はImageToolsを
                    // そのままBitmapImageにストリームを食わせる
                    bmp.SetSource(strm);
                }
            }

            return bmp;
        }

        public object ConvertBack(object value, Type targetType, object parameter, CultureInfo culture) {
            throw new NotImplementedException();
        }
    }
}
以上で実装は終わりです。実行してみましょう。結果後のスクリーンショットでは分かりにくいのですが、ダウンロードが完了した順に画像が表示されています。
JPEG画像とGIF画像がListBoxに表示されています。