メールの受信時などユーザーへの通知や通知に対する応答をする為のメッセージバルーンをプログラムから表示する方法をご紹介します。
メッセージ バルーンを表示する
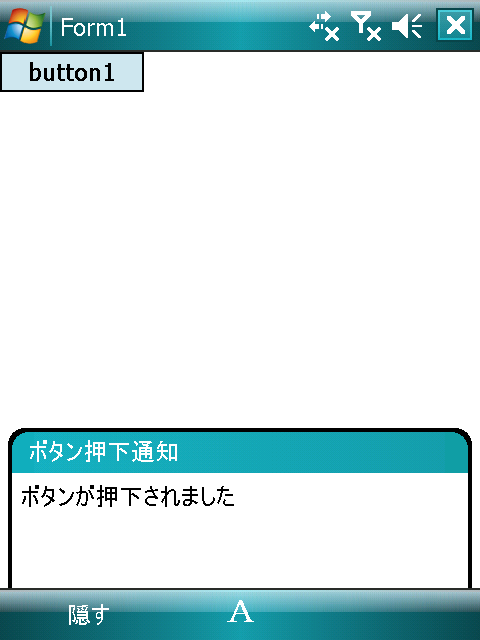
メールの受信時などユーザーへの通知や通知に対する応答をする為のメッセージバルーンをプログラムから表示します。
メッセージバルーンは表示領域の最下部から上に向かって表示されるところから「トースト」の愛称で呼ばれる事もあります。
ここではメッセージバルーンをプログラムから表示する方法をご紹介します。
    private Notification1 as Microsoft.WindowsCE.Forms.Notification = nothing
    public sub Form_Load()
        Notification1 as New Microsoft.WindowsCE.Forms.Notification()
        Notification1.Caption = "ボタン押下通知"
        Notification1.Text = "ボタンが押下されました"
    end sub

    ' ボタンを押下すると20秒間メッセージバルーンを表示します
    public sub Button_Click()
        Notification1.InitialDuration = 20
        Notification1.Visible = True
    end sub
上記のサンプルコードでは、FormのLoadイベントでNotificationを作成し、メッセージバルーンに表示する内容の設定を行います。
ボタンを押下することでVisibleプロパティをTrueにし、20秒間メッセージバルーンに表示します。

警告のメッセージバルーンを表示する
緊急かつ重要な通知を行う場合、Criticalプロパティをtrueに設定する事で、メッセージバルーンの背景色を赤にし、ユーザーへ警告を促します。

    private Notification1 as Microsoft.WindowsCE.Forms.Notification = nothing
    public sub Form_Load()
        Notification1 as New Microsoft.WindowsCE.Forms.Notification()
        Notification1.Caption = "ボタン押下通知"
        Notification1.Text = "ボタンが押下されました"

        ' 警告のメッセージバルーンである設定をする
        Notification1.Critical = True
    end sub

    ' ボタンを押下すると20秒間メッセージバルーンを表示します
    public sub Button_Click()
        Notification1.InitialDuration = 20
        Notification1.Visible = True
    end sub
上記のサンプルコードでは、ボタンを押下するとメッセージバルーンの背景色が赤色のメッセージバルーンを表示されます。

Criticalプロパティは、既定値では Falseになっており、メッセージバルーンの背景色はWindows Mobileの現在のテーマに応じたものになります。
応答可能なメッセージ バルーンを表示する
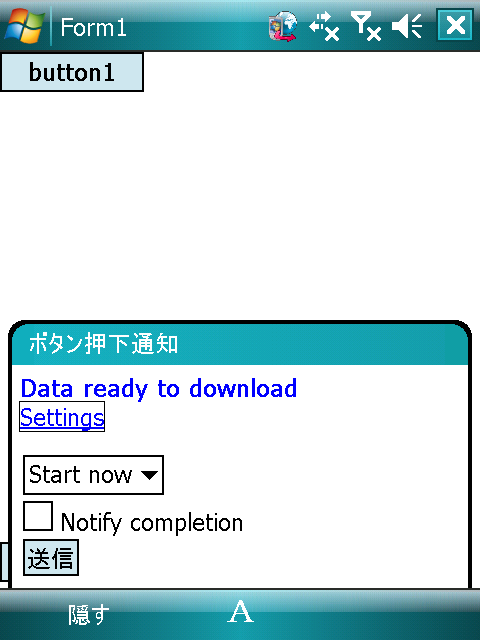
メッセージ バルーンはプレーンテキストだけではなく、メッセージバルーン内のHTML要素を変更する事で、通知に対するユーザーの入力を受け付ける事が出来ます。メッセージバルーンの表示方法に関してはこちら(→メッセージ バルーンを表示する)をご覧下さい。
ここではメッセージバルーンで、ハイパーリンクやチェックボックスを表示します。
Submit側
    private Notification1 as Microsoft.WindowsCE.Forms.Notification = nothing
    public sub Form_Load()
        Notification1 as New Microsoft.WindowsCE.Forms.Notification()
        Notification1.Caption = "ボタン押下通知"
        Notification1.InitialDuration = 20

        Dim sb As New System.Text.StringBuilder
        sb.Append("<html><body>")
        sb.Append("   <font color='#0000FF'><b>Data ready to download</b></font><br/>")
        sb.Append("   <a href='settings'>Settings</a><br/>")
        sb.Append("   <form method='GET' action='notify'>")
        sb.Append("     <SELECT NAME='lstbx'>")
        sb.Append("       <OPTION VALUE='0'>Start now</OPTION>")
        sb.Append("       <OPTION VALUE='1'>In 1 hrs</OPTION>")
        sb.Append("       <OPTION VALUE='2'>In 2 hrs</OPTION>")
        sb.Append("       <OPTION VALUE='3'>In 3 hrs</OPTION>")
        sb.Append("       <OPTION VALUE='4'>In 4 hrs</OPTION>")
        sb.Append("     </SELECT><br/>")
        sb.Append("     <input type='checkbox' name='chkbx'>Notify completion</input><br/>")
        sb.Append("     <input type='submit'/>")
        sb.Append("   </form>")
        sb.Append("</body></html>")

        Notification1.Text = sb.ToString()
    end sub

    ' ボタンを押下すると20秒間メッセージバルーンを表示します
    public sub Button_Click()
        Notification1.Visible = True
    end sub
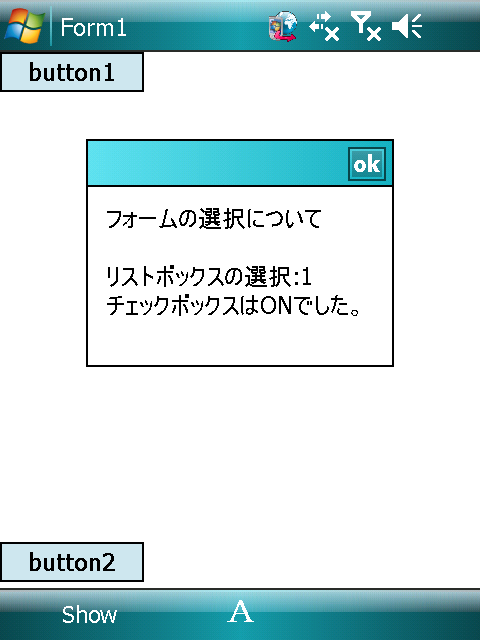
HTMLは、HTMLコントロールによって表示されます。また、Response プロパティを使用して、ResponseSubmittedEventArgs クラスによって提供される応答文字列を解析することによって、HTML フォーム内の値を取得する事が出来ます。

Response側
Private Sub OnResponseSubmitted(obj As Object, _
                                resevent As ResponseSubmittedEventArgs) _
                                Handles Notification1.ResponseSubmitted

   ' Use a StringBuilder to create a log of the response.
   Dim LogResponse As New StringBuilder()

   ' If the response contains the name specified for the action value
   ' of the HTML form, in this case "notify," get the value of the
   ' selected option from the SELECT list. An example of the
   ' response string would be notify?lstbx=0.
   If resevent.Response.Substring(0, 6) = "notify" Then
      Dim choice As Integer = Convert.ToInt32(resevent.Response.Substring(13, 1))
      Select Case choice
         Case 0
            LogResponse.Equals("submit")
         Case 1
            LogResponse.Equals("opt 1")
         Case 2
            LogResponse.Equals("opt 2")
         Case 3
            LogResponse.Equals("opt 3")
         Case 4
            LogResponse.Equals("opt 4")
      End Select
      ' If the checkbox in the form is checked, the response
      ' string could be as follows: notify?lstbx=0chkbx=on
      ' You can determine whether the check box is selected
      ' by checking whether the response ends with "on".
      If resevent.Response.EndsWith("on") Then
         LogResponse.Equals("checkbox")
      End If

   ' If the user clicked the settings link,
   ' log the response. This example could display
   ' a dialog box by activating another form.
   ElseIf resevent.Response = "settings" Then
      ' Display a settings dialog by activating
      ' a form named 'Settings':
      ' Settings.Activate
      LogResponse.Equals("Postponed by clicking link")

      ' The user needs to respond to the notification
      ' after checking the settings, so set the
      ' InitialDuration and Visible properties so
      ' that the icon appears in the title bar.
      Notification1.InitialDuration = 0
      Notification1.Visible = True
   End If

   ' Display the response on the status bar.
   StatusBar1.Text = LogResponse.ToString() + " HTML: " + resevent.Response.ToString()
End Sub
初回時に表示せずにタイトル バーに通知アイコンを表示する
メッセージバルーンを初回時に表示せずにタイトル バーに通知アイコンに表示することができます。
InitialDuration プロパティを使った方法
InitialDurationプロパティはメッセージバルーンを初回時に表示しつづける時間を設定出来ます。こちら(→メッセージ バルーンを表示する)では、メッセージバルーンを20秒間に設定していました。
InitialDurationプロパティは 0 を設定することで、メッセージバルーンを初回時に表示せずにタイトル バーに通知アイコンに表示することができます。
   private Notification1 as Microsoft.WindowsCE.Forms.Notification = nothing
   public sub Form_Load()
       Notification1 as New Microsoft.WindowsCE.Forms.Notification()
       Notification1.Caption = "ボタン押下通知"
       Notification1.Text = "ボタンが押下されました"

       Notification1.InitialDuration = 0
   end sub

   public sub Button_Click()
       Notification1.Visible = True
   end sub
通知アイコンをクリックするとメッセージ バルーンを表示します。
"cmd:n" 識別子を使った方法
"cmd:n" 識別子を使うことでメッセージバルーンを初回時に表示せずにタイトル バーに通知アイコンに表示することができます。

    private Notification1 as Microsoft.WindowsCE.Forms.Notification = nothing
    public sub Form_Load()
        Notification1 as New Microsoft.WindowsCE.Forms.Notification()
        Notification1.Caption = "ボタン押下通知"
        Notification1.Text = "ボタンが押下されました"

        '
        Dim sb As New System.Text.StringBuilder
        sb.Append("<html><body>")
        sb.Append("   <font color='#0000FF'><b>Data ready to download</b></font><br/>")
        sb.Append("   <a href='settings'>Settings</a><br/>")
        sb.Append("   <form method='GET' action='notify'>")
        sb.Append("     <input type='submit'/>")
        sb.Append("     <input type='button' name='cmd:2' value='Postpone'/>")
        sb.Append("   </form>")
        sb.Append("</body></html>")

        Notification1.Text = sb.ToString()
    end sub

    ' ボタンを押下するとメッセージバルーンを表示します
    public sub Button_Click()
        Notification1.Visible = True
    end sub
"cmd:n" (n は任意の整数) 形式のボタン、または要素の名前が含まれている場合には、ResponseSubmitted イベントが発生せず、メッセージバルーンは消されますが後から応答出来る様にタイトルバーにアイコンが表示されます。
ただし、メッセージバルーンを消すためだけに"cmd:n" 識別子を使用する場合は、Windows Mobileでは"cmd:2"識別子を設定してください。

関連記事
Windows Mobile(.NET Compact Framework)を使ってアプリ開発する際に逆引きとしてお使いください。