今日起きたら @salvare777 さんから以下の質問を頂いておりました。
@ch3coohはじめましてブログを拝見してもしかしたらなと思い質問させてもらいます。 詳しい説明が必要な場合は説明いたします 現在ストアアプリの開発を行っているのですが、(続く)
2014-02-15 04:51:39 via web to @ch3cooh
@ch3coohいくつかの小さい画像データを合成し画像を生成しようとしているのですがwriteablebitmap.blitでは千の処理は負荷がかかるようで他にストアアプリで使用できる方法があればご教示お願いしたいです。知識としてはC#しかないため手詰まり気味です・・・
2014-02-15 04:52:14 via web to @ch3cooh
@ch3cooh えと、合成というよりは 大きいbitmapに小さい画像データを順番ずつ描画していって画像を完成させるという処理なのですが それをBlitで代用できないかと思ったのですが・・・
2014-02-15 06:18:29 via web to @ch3cooh
ちょうど寝ていた時間帯だったのですぐに返事をすることができなくて、前後のツイートを見てもどういう状況かわからなかったので半分以上推測です。たぶんこんなことをしたいんだろうなぁーと仮説を立てて、その対策を書きたいと思います。認識違いしてたらごめんなさい。
仮説:いくつかの小さい画像データを合成し画像を生成したい
ここから本編。
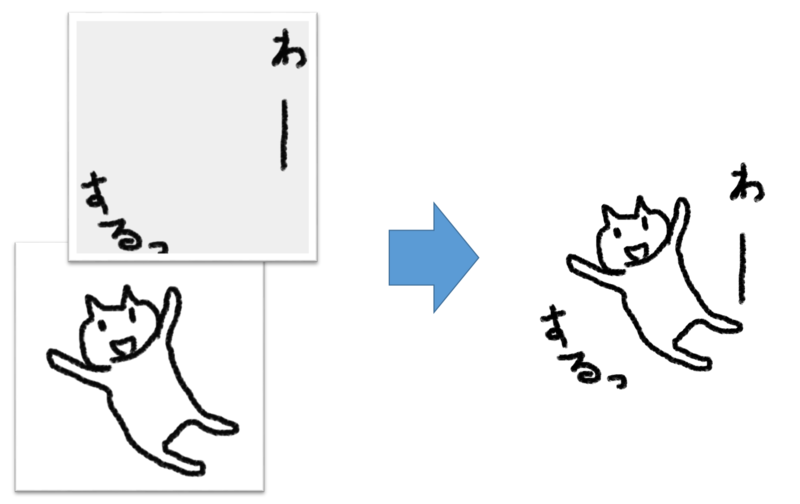
下図のようにWriteableBitmapを複数枚用意していて、それらすべての画像を合成したいと解釈しました。
「わーっ」と描かれたセリフ画像と「滑っているネコ」が描かれている画像を1つの画像として合成したいのかな……と。

おそらく @salvare777 さんが負荷がかかるとおっしゃられている処理は、昔にBaseball Japanでのセカンダリ・タイルの作成方法を「WriteableBitmapを使ってBackground.pngの背景色を変更する」のように、ピクセル単位での処理をおこなっているのだと推測しました。
WriteableBitmapクラスには、WriteableBitmap.Blitといういかにもピクセル処理してますよというメソッドはないので、おそらくWriteableBitmapExを使っているのかもしれません。僕も過去にBlitメソッドには頭を傷めた記憶があります。
Windows 8.0向けのWindowsストアアプリでは、確かに画像の合成はその方法しかありませんでした。UIElementからBitmapImageに変換することができなくて、Windows Phoneからアプリの移植を諦めた人も多かったのではないでしょうか。
Windows 8.1向けのWindowsストアアプリからは、(Windows Phoneの方法とはかなり異なるのですが)UIElementからビットマップを生成する方法としてRenderTargetBitmapクラスが提供されています。
このエントリで紹介する複数の画像を合成する方法
このエントリでは、RenderTargetBitmapクラスを使って複数の画像を合成する方法を紹介しましょう。
RenderTargetBitmapクラスの使い方、注意点は既に先達の方々が書いてくださっています。
表示するアプリを作る(XAML)
Visual Studioを起動して、プロジェクトウィザードから一番シンプルな「新しいアプリケーション」を選択します。
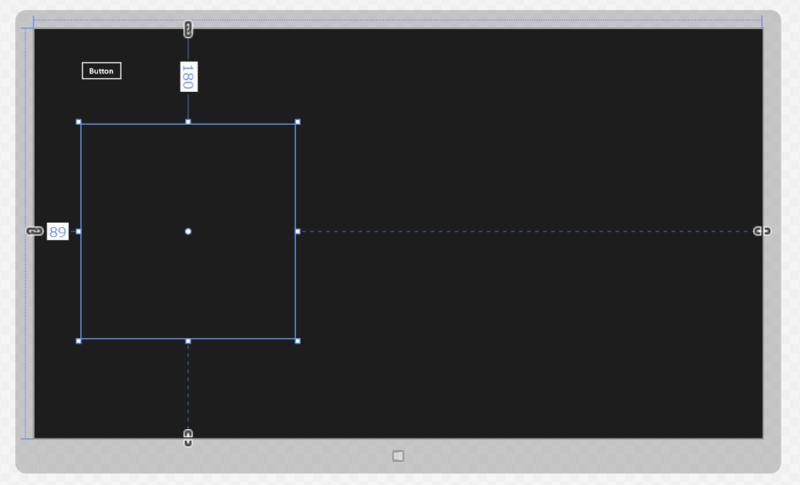
適当にButtonと合成後の画像を格納するためImageを配置しました。

MainPage.xamlは以下のようになりました。
<Page
    x:Class="BltSample.MainPage"
    xmlns="http://schemas.microsoft.com/winfx/2006/xaml/presentation"
    xmlns:x="http://schemas.microsoft.com/winfx/2006/xaml"
    xmlns:local="using:BltSample"
    xmlns:d="http://schemas.microsoft.com/expression/blend/2008"
    xmlns:mc="http://schemas.openxmlformats.org/markup-compatibility/2006"
    mc:Ignorable="d">

    <Grid x:Name="LayoutRoot"
        Background="{ThemeResource ApplicationPageBackgroundThemeBrush}">

        <Button Content="Button" HorizontalAlignment="Left"
             Margin="86,59,0,0" VerticalAlignment="Top" Click="Button_Click"/>

        <Image x:Name="OutputImage" HorizontalAlignment="Left" Height="400"
             Margin="91,180,0,0" VerticalAlignment="Top" Width="400"/>

    </Grid>
</Page>
このXAMLでもっとも重要なことは、Pageの子要素のGridにLayoutRootと名前を付けていることです。RenderTargetBitmapを使う上で重要な要素になります。
複数の画像をRenderTargetBitmapクラスを使って合成する
少し冗長なコードになってしまったので、番号を振って説明していきたいと思います。
- (今回のテスト用に)アプリリソースから画像を読み込んでWriteableBitmapに変換
- 合成するベースとしてGridを生成して、複数のImageをGridに追加していく
- 一時的にLayoutRootにGridを追加して、RenderTargetBitmapを使ってビットマップにUIElementをレンダリングする
- レンダリングされたビットマップを再度WriteableBitmapに変換して表示
この手順を想像して頂いた上でコードを読んでみてください。
private async void Button_Click(object sender, RoutedEventArgs e)
{
    // (1) アプリリソースの画像ファイルを読み込んでWriteableBitmapに変換

    var file1 = await StorageFile.GetFileFromApplicationUriAsync(
        new Uri("ms-appx:///Assets/neko1.png"));
    var bitmap1 = await LoadWriteableBitmapAsync(await file1.OpenReadAsync());
    var file2 = await StorageFile.GetFileFromApplicationUriAsync(
        new Uri("ms-appx:///Assets/neko2.png"));
    var bitmap2 = await LoadWriteableBitmapAsync(await file2.OpenReadAsync());

    // (2) UIElementをコード上で生成して複数の画像を重ね合わせる

    // 画像として出力する土台となるGridを作る
    var grid = new Grid()
    {
        Width = 600,
        Height = 600
    };

    var image1 = new Image()
    {
        Width = 600,
        Height = 600,
        Stretch = Stretch.Fill,
        Source = bitmap1
    };
    grid.Children.Add(image1);

    var image2 = new Image()
    {
        Width = 600,
        Height = 600,
        Stretch = Stretch.Fill,
        Source = bitmap2
    };
    grid.Children.Add(image2);

    // (3) 合成した画像をピクセルを取得する

    // かなりイケてないが一度画面上に表示しなければレンダリングされない

    // Gridを画面に追加する
    LayoutRoot.Children.Add(grid);

    // Gridをビットマップにレンダリングする
    var renderTargetBitmap = new RenderTargetBitmap();
    await renderTargetBitmap.RenderAsync(grid);

    // Gridを画面から除去する
    LayoutRoot.Children.Remove(grid);

    // (4) レンダリングされたビットマップのピクセル配列をWriteableBitmapに変換する
    var pixelBuffer = await renderTargetBitmap.GetPixelsAsync();
    var outputBitmap = CreateWriteableBitmapFromArray(
        (int)grid.Width, (int)grid.Height, pixelBuffer.ToArray());

    OutputImage.Source = outputBitmap;
}
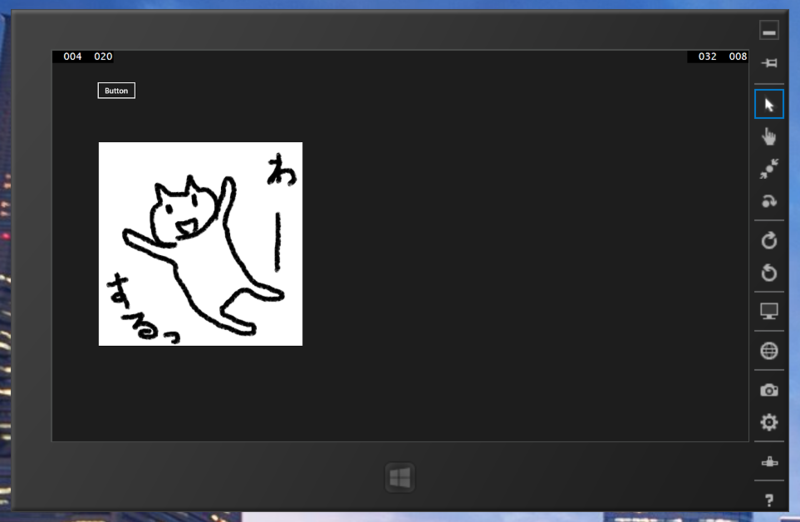
実行すると下図のようにセリフとネコの画像が1つに合成されます。

おまけ
今回ヘルパー的に使用したメソッドが2つあります。
- LoadWriteableBitmapAsync メソッド
- CreateWriteableBitmapFromArray メソッド
コードの中にできるだけ説明を書いたので使い方はお察しください。
/// <summary>
/// バイト配列からWriteableBitmapを生成する
/// </summary>
/// <param name="width">幅</param>
/// <param name="height">高さ</param>
/// <param name="array">ピクセルデータ</param>
/// <returns>WriteableBitmapオブジェクト</returns>
public WriteableBitmap CreateWriteableBitmapFromArray(int width, int height, byte[] array)
{
    // 出力用のWriteableBitmapオブジェクトを生成する
    var bitmap = new WriteableBitmap(width, height);
    // WriteableBitmapへバイト配列のピクセルデータをコピーする
    using (var pixelStream = bitmap.PixelBuffer.AsStream())
    {
        pixelStream.Seek(0, SeekOrigin.Begin);
        pixelStream.Write(array, 0, array.Length);
    }
    return bitmap;
}


/// <summary>
/// IRandomAccessStreamからWriteableBitmapを生成する
/// </summary>
/// <param name="stream">ランダムアクセスストリーム</param>
/// <returns>WriteableBitmapオブジェクト</returns>
private async Task<WriteableBitmap> LoadWriteableBitmapAsync(IRandomAccessStream stream)
{
    // ストリームからピクセルデータを読み込む
    var decoder = await BitmapDecoder.CreateAsync(stream);
    var transform = new BitmapTransform();
    var pixelData = await decoder.GetPixelDataAsync(decoder.BitmapPixelFormat, decoder.BitmapAlphaMode,
        transform, ExifOrientationMode.RespectExifOrientation, ColorManagementMode.ColorManageToSRgb);
    var pixels = pixelData.DetachPixelData();

    // ピクセルデータからWriteableBitmapオブジェクトを生成する
    return CreateWriteableBitmapFromArray(
        (int)decoder.OrientedPixelWidth, (int)decoder.OrientedPixelHeight, pixels);
}
まとめ
僕の書いたネコは、ひょっとしてかわいいかもしれません。
おわり。