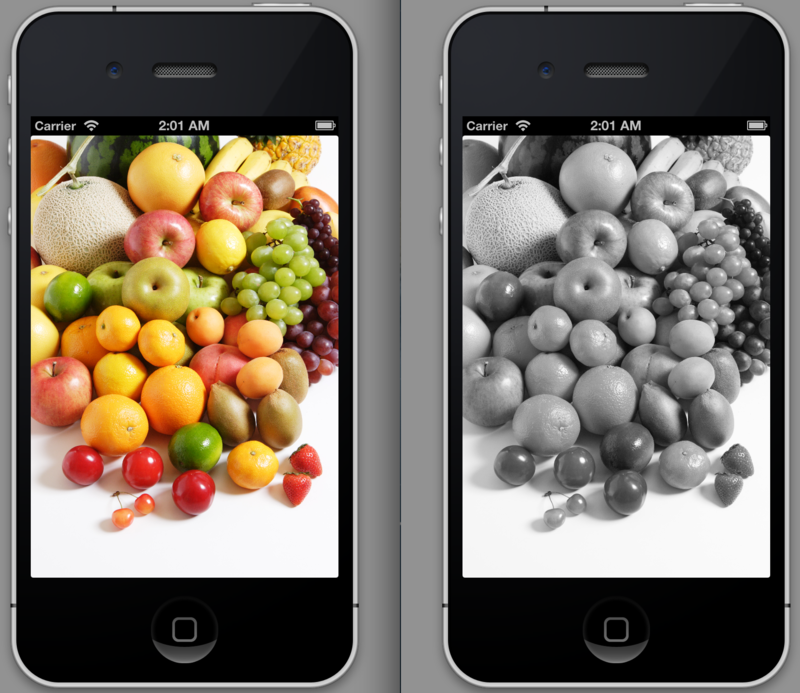
Xamarin.iOSを使って、画像処理をしてみましょう。
基本的にはObjective-CのコードをそのままC#への置き換えする形となります。本記事では、過去にWindowsストアアプリ向けに実装したグレースケール変換処理を移植してみましょう。
UIImageオブジェクトからピクセル配列を取得するには、以下の手順で処理を実行する必要があります。
+UIImageを構成するCGImageを取得する +データプロバイダーを介してピクセルデータのバッファのポインタを取得する +ピクセルデータのバッファをbyte配列のバッファにコピー
取得したbyte配列のバッファにグレースケール処理をおこないます。逆にbyte配列からUIImageオブジェクトに変換する場合には、以下の手順で処理をおこないます。
+画像処理したbyte配列のバッファを元にデータプロバイダーを作成 +データプロバイダーを介してCGImageを作成 +CGImageからUIImageを作成
この手順をC#で置き換えて実装してみましょう。
|cs| ///
/// Graies the scale. /// ///The scale. /// Source image. UIImage GrayScale (UIImage srcImage) { var cgImage = srcImage.CGImage;
int width = cgImage.Width;
int height = cgImage.Height;
int bitsPerComponent = cgImage.BitsPerComponent;
int bitsPerPixel = cgImage.BitsPerPixel;
int bytesPerRow = cgImage.BytesPerRow;
var colorSpace = cgImage.ColorSpace;
var bitmapInfo = cgImage.BitmapInfo;
var shouldInterpolate = cgImage.ShouldInterpolate;
var intent = cgImage.RenderingIntent;

// データプロバイダを取得する
byte[] bytes;
using (var dataProvider = cgImage.DataProvider)
using (var data = dataProvider.CopyData())
{
    // ビットマップデータを取得する
    var butter = data.Bytes;
    bytes = new byte[data.Length];
    System.Runtime.InteropServices.Marshal.Copy(
        butter, bytes, 0, bytes.Length);
}

// グレースケール処理をおこなう
int pixelCount = width * height;
for (int i = 0; i < pixelCount; i++)
{
    var index = i * 4;

    // 単純平均法で輝度を求める
    var sum = bytes[index + 0] + bytes[index + 1] + bytes[index + 2];
    var y = (double)sum / 3;

    bytes[index + 0] = (byte)Math.Min(255, Math.Max(0, y));
    bytes[index + 1] = (byte)Math.Min(255, Math.Max(0, y));
    bytes[index + 2] = (byte)Math.Min(255, Math.Max(0, y));
    bytes[index + 3] = bytes[index + 3];
}

// 画像処理後のbyte配列を元にデータプロバイダーを作成する
var effectedDataProvider
    = new MonoTouch.CoreGraphics.CGDataProvider(bytes, 0, bytes.Length);

// データプロバイダーからCGImageを作成し、CGImageからUIImageを作成する
var effectedCgImage = new MonoTouch.CoreGraphics.CGImage(
    width, height,
    bitsPerComponent, bitsPerPixel, bytesPerRow,
    colorSpace, bitmapInfo, effectedDataProvider,
    null, shouldInterpolate, intent);
return new UIImage(effectedCgImage);
} ||<
例えば、アプリケーションの起動時(というか画面の表示後)にUIImageViewに表示されている画像をグレースケール変換し、再度UIImageViewに設定して表示するコードは以下の通りです。
|cs| public override void ViewDidAppear (bool animated) { base.ViewDidAppear (animated);
UIImage grayImage = GrayScale(imageView.Image);
imageView.Image = grayImage;
} ||<
画面が表示された瞬間はカラー画像、しばらくして画像処理が完了した後はグレースケール画像が表示されます。

うーん。コードの共有化が可能なところを整理し直せば、WriteableBitmapEffectorのUIImage版が作成できそうだなぁ。
**サンプルプロジェクト
サンプルプロジェクトをGitHubで公開しています。
- 関連記事
Xamarin.iOSを使ってアプリ開発する際に逆引きとしてお使いください。